Create Plugin
Design Automation uses .bundle just like the Autodesk App Store, meaning you need to create a PackageContents.xml and a ZIP with the DLL (and other required files). For detailed information on how to create them, please visit Autodesk App Store Developer Center.
At this section we will create a basic plugin that update width and height parameter and save the resulting file. Also the supporting files (PackageContents.xml) and the folder structure to place them. Finally create a .ZIP file ready to upload to Design Automation.
In the root folder, create a bundles folder.
Prerequisites
- 7zip: use to create the .ZIP with bundle files, please install from here. This tutorial assumes 7zip is installed on the default folder:
C:\Program Files\7-Zip\7z.exe.
Additional prerequisites
For the next session you can use the pre-build plugin. Or if you decide to build it, you will need
Visual Studio: Visual Studio 2019 or newer is required, please visit this link.
AutoCAD, Inventor, Revit or 3ds Max: In order to develop, test and debug your Design Automation plugin: AutoCAD | Inventor | Revit | 3ds Max.
For the next step, choose the Engine, which is the Autodesk application where you plugin will run. You'll need the respective application installed in order to compile, debug and test locally.
Choose the engine
- AutoCAD Plugin
- Inventor Plugin
- Revit Plugin
- 3ds Max Plugin
This step will help you create a basic AutoCAD plugin for Design Automation. For more information, please visit My First AutoCAD Plugin tutorial.
You may download the Bundle ZIP into the
bundles/(Node.js) or/designAutomationSample/wwwroot/bundles(.NET 6) folder and skip to Upload Plugin Bundle section.
Create a new project
- Right-click on the solution, the Add >> New Project.
- Select Windows Desktop, then Class Library and, finally, name it
UpdateDWGParam. - Then right-click on the project, go to Manage NuGet Packages..., under Browser you can search for AutoCAD.NET and install
AutoCAD.NET.Core(which also installsAutoCAD.NET.Model). - Then search and install
Newtonsoft.Json(which is used to parse input data in JSON format).
Please select .NET Framework 4.8. If not listed, please install the Dev Pack.
As a result, the package.config should look like the following. This sample uses version 20, which should work on all available versions. You may adjust to a specific version.
The project should contain a Class1.cs class, let's rename the file to Commands.cs (for consistency).
using Autodesk.AutoCAD.ApplicationServices.Core;
using Autodesk.AutoCAD.DatabaseServices;
using Autodesk.AutoCAD.Runtime;
using Newtonsoft.Json;
using System.IO;

[assembly: CommandClass(typeof(UpdateDWGParam.Commands))]
[assembly: ExtensionApplication(null)]

namespace UpdateDWGParam
{
    public class Commands
    {
        [CommandMethod("UpdateParam", CommandFlags.Modal)]
        public static void UpdateParam()
        {
            //Get active document of drawing with Dynamic block
            var doc = Application.DocumentManager.MdiActiveDocument;
            var db = doc.Database;

            // read input parameters from JSON file
            InputParams inputParams = JsonConvert.DeserializeObject<InputParams>(File.ReadAllText("params.json"));

            using (Transaction t = db.TransactionManager.StartTransaction())
            {
                var bt = t.GetObject(db.BlockTableId, OpenMode.ForRead) as BlockTable;

                foreach (ObjectId btrId in bt)
                {
                    //get the blockDef and check if is anonymous
                    BlockTableRecord btr = (BlockTableRecord)t.GetObject(btrId, OpenMode.ForRead);
                    if (btr.IsDynamicBlock)
                    {
                        //get all anonymous blocks from this dynamic block
                        ObjectIdCollection anonymousIds = btr.GetAnonymousBlockIds();
                        ObjectIdCollection dynBlockRefs = new ObjectIdCollection();
                        foreach (ObjectId anonymousBtrId in anonymousIds)
                        {
                            //get the anonymous block
                            BlockTableRecord anonymousBtr = (BlockTableRecord)t.GetObject(anonymousBtrId, OpenMode.ForRead);
                            //and all references to this block
                            ObjectIdCollection blockRefIds = anonymousBtr.GetBlockReferenceIds(true, true);
                            foreach (ObjectId id in blockRefIds)
                            {
                                dynBlockRefs.Add(id);
                            }
                        }
                        if (dynBlockRefs.Count > 0)
                        {
                            //Get the first dynamic block reference, we have only one Dyanmic Block reference in Drawing
                            var dBref = t.GetObject(dynBlockRefs[0], OpenMode.ForWrite) as BlockReference;
                            UpdateDynamicProperties(dBref, inputParams);
                        }
                    }
                }
                t.Commit();
            }
            LogTrace("Saving file...");
            db.SaveAs("outputFile.dwg", DwgVersion.Current);
        }

        /// <summary>
        /// This updates the Dyanmic Blockreference with given Width and Height
        /// The initial parameters of Dynamic Blockrefence, Width =20.00 and Height =40.00
        /// </summary>
        /// <param Editor="ed"></param>
        /// <param BlockReference="br"></param>
        /// <param String="name"></param>
        private static void UpdateDynamicProperties(BlockReference br, InputParams inputParams)
        {
            // Only continue is we have a valid dynamic block
            if (br != null && br.IsDynamicBlock)
            {
                // Get the dynamic block's property collection
                DynamicBlockReferencePropertyCollection pc = br.DynamicBlockReferencePropertyCollection;
                foreach (DynamicBlockReferenceProperty prop in pc)
                {
                    switch (prop.PropertyName)
                    {
                        case "Width":
                            prop.Value = inputParams.Width;
                            break;
                        case "Height":
                            prop.Value = inputParams.Height;
                            break;
                        default:
                            break;
                    }
                }
            }
        }

        /// <summary>
        /// This will appear on the Design Automation output
        /// </summary>
        private static void LogTrace(string format, params object[] args) { Application.DocumentManager.MdiActiveDocument.Editor.WriteMessage(format, args); }
    }

    public class InputParams
    {
        public double Width { get; set; }
        public double Height { get; set; }
    }
}
This is the main code that will run with AutoCAD. Copy the following content into Commands.cs. The class contains one custom AutoCAD command, UpdateParam, defined as a method with the same name. This command is called by Design Automation engine, as will be specified on the Activity (next step of this tutorial)
<?xml version="1.0" encoding="utf-8" ?>
<ApplicationPackage SchemaVersion="1.0" Version="1.0" ProductCode="{F11EA57A-1E7E-4B6D-8E81-986B071E3E07}" Name="AutoCADDesignAutomation" Description="Sample Plugin for AutoCAD" Author="tutorials.autodesk.io>">
  <CompanyDetails Name="Autodesk, Inc" Url="http://tutorials.autodesk.io" Email="forge.help@autodesk.com"/>
  <Components>
    <RuntimeRequirements OS="Win64" Platform="AutoCAD"/>
    <ComponentEntry AppName="UpdateWindowParameters" ModuleName="./Contents/UpdateDWGParam.dll" AppDescription="AutoCAD .NET App to update parameters of Dynamic blockreference in AutoCAD Drawing" LoadOnCommandInvocation="True" LoadOnAutoCADStartup="True">
      <Commands GroupName="FPDCommands">
        <Command Global="UpdateParam" Local="UpdateParam"/>
      </Commands>
    </ComponentEntry>
  </Components>
</ApplicationPackage>
Create a folder named UpdateDWGParam.bundle and, inside, a file named PackageContents.xml, then copy the following content to it. Learn more at the PackageContents.xml Format Reference. This file defines the new AutoCAD custom command UpdateParam that will be called when Design Automation executes.
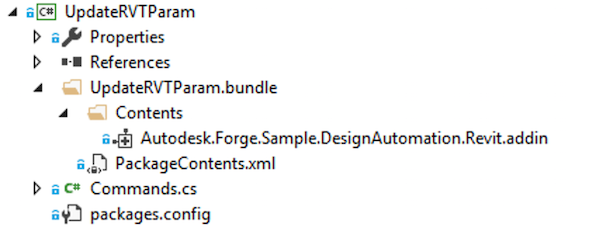
Finally, create a subfolder named Contents and leave it empty. At this point, the project should look like:
Post-build event
For Node.js it is required to adjust the AppBundle ZIP output folder.
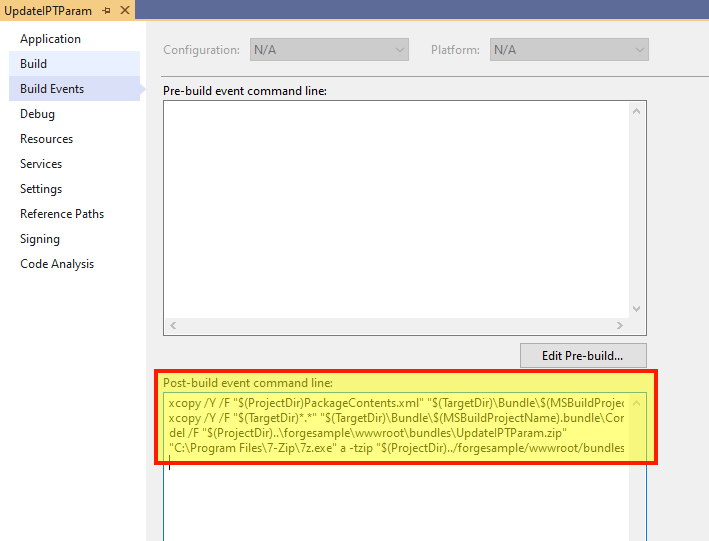
Now we need to ZIP the .bundle folder. Right-click on the project, select Properties, then open Build Events and copy the following into Post-build event command line field, as shown on the image below.
xcopy /Y /F "$(TargetDir)*.dll" "$(ProjectDir)UpdateDWGParam.bundle\Contents\"
del /F "$(ProjectDir)..\designAutomationSample\wwwroot\bundles\UpdateDWGParam.zip"
"C:\Program Files\7-Zip\7z.exe" a -tzip "$(ProjectDir)../designAutomationSample/wwwroot/bundles/UpdateDWGParam.zip" "$(ProjectDir)UpdateDWGParam.bundle\" -xr0!*.pdb
This will copy the DLL from /bin/debug/ into .bundle/Contents folder, then use 7zip to create a zip, then finally copy the ZIP into /bundles folders of the webapp.
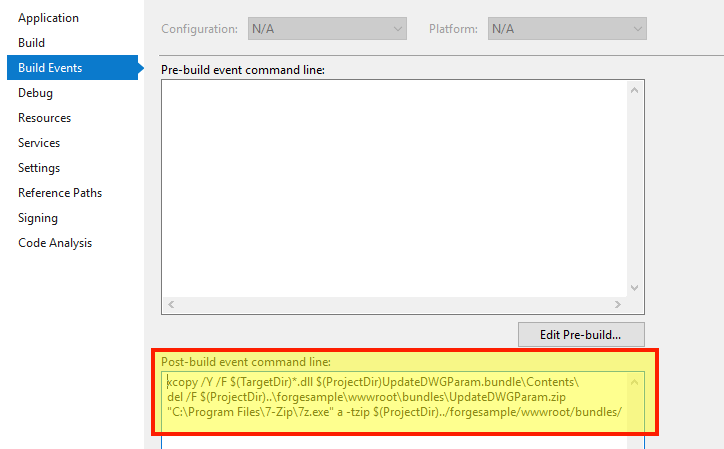
Note how the Post-build event uses the project and folder names, so make sure you're using this names.
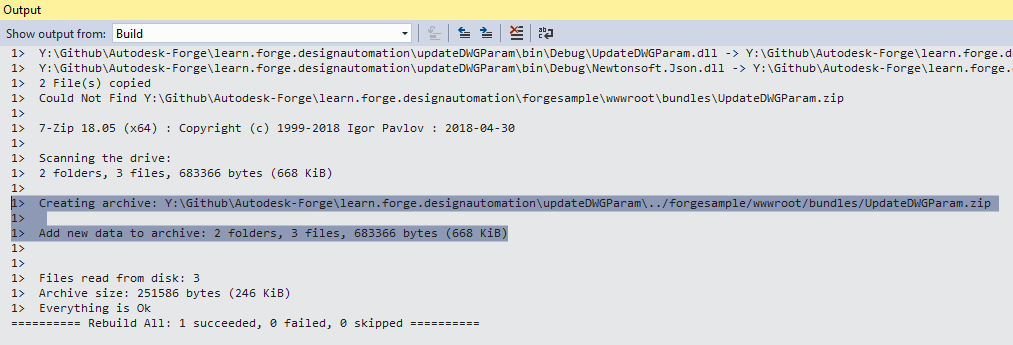
If you build the UpdateDWGParam project now you should see something like this on the Output window. Note the 2 folders and 3 files zipped. The zip file is created directly at the /wwwroot/bundles folder. This means you're doing great!
This step will help you create a basic Inventor plugin. For more information, please visit My First Inventor Plugin tutorial.
You may download the Bundle ZIP into the
bundles/(Node.js) or/designAutomationSample/wwwroot/bundles(.NET Core) folder and skip to Upload Plugin Bundle section.
Prerequisites
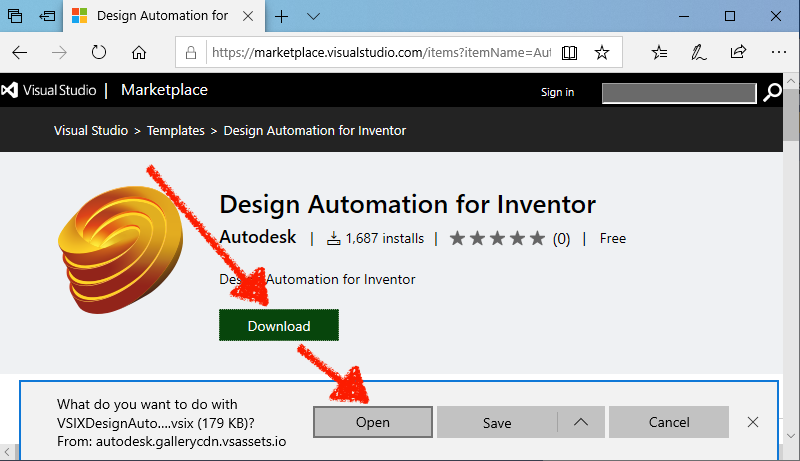
- Design Automation for Inventor template: go to the Visual Studio Market Place, download and open it from this link, then follow the steps to install.
Create a new project
Right-click on the solution, the Add >> New Project. Search for Inventor templates, then Plugin project and, finally, name it UpdateIPTParam. Right-click on the project, go to Manage NuGet Packages..., under Browse you can select Newtonsoft.Json and update (this package is already in the solution, if not, install)
Please select .NET Framework 4.7. If not listed, please install the Dev Pack.
SampleAutomation.cs
Open the SampleAutomation.cs file and copy the following content to it. This is where the parameters are updated under the Run method.
using Inventor;
using Newtonsoft.Json;
using System;
using System.Collections.Generic;
using System.Diagnostics;
using System.Runtime.InteropServices;
using System.Threading;

namespace UpdateIPTParam
{
    [ComVisible(true)]
    public class SampleAutomation
    {
        private InventorServer m_server;
        public SampleAutomation(InventorServer app) { m_server = app; }

        public void Run(Document doc)
        {
            try
            {
                // update parameters in the doc
                ChangeParameters(doc);

                // generate outputs
                var docDir = System.IO.Path.GetDirectoryName(doc.FullFileName);

                // save output file
                var documentType = doc.DocumentType;
                if (documentType == DocumentTypeEnum.kPartDocumentObject)
                {
                    // the name must be in sync with OutputIpt localName in Activity
                    var fileName = System.IO.Path.Combine(docDir, "outputFile.ipt");

                    // save file
                    doc.SaveAs(fileName, false);
                }
            }
            catch (Exception e) { LogTrace("Processing failed: {0}", e.ToString()); }
        }

        /// <summary>
        /// Change parameters in Inventor document.
        /// </summary>
        /// <param name="doc">The Inventor document.</param>
        /// <param name="json">JSON with changed parameters.</param>
        public void ChangeParameters(Document doc)
        {
            var theParams = GetParameters(doc);

            Dictionary<string, string> parameters = JsonConvert.DeserializeObject<Dictionary<string, string>>(System.IO.File.ReadAllText("params.json"));
            foreach (KeyValuePair<string, string> entry in parameters)
            {
                try
                {
                    Parameter param = theParams[entry.Key.ToLower()];
                    param.Expression = entry.Value;
                }
                catch (Exception e) { LogTrace("Cannot update {0}: {1}", entry.Key, e.Message); }
            }
            doc.Update();
        }

        /// <summary>
        /// Get parameters for the document.
        /// </summary>
        /// <returns>Parameters. Throws exception if parameters are not found.</returns>
        private static Parameters GetParameters(Document doc)
        {
            var docType = doc.DocumentType;
            switch (docType)
            {
                case DocumentTypeEnum.kAssemblyDocumentObject:
                    var asm = doc as AssemblyDocument;
                    return asm.ComponentDefinition.Parameters;
                case DocumentTypeEnum.kPartDocumentObject:
                    var ipt = doc as PartDocument;
                    return ipt.ComponentDefinition.Parameters;
                default:
                    throw new ApplicationException(string.Format("Unexpected document type ({0})", docType));
            }
        }

        /// <summary>
        /// This will appear on the Design Automation output
        /// </summary>
        private static void LogTrace(string format, params object[] args) { Trace.TraceInformation(format, args); }
    }
}
Post-build event
For Node.js it is required to adjust the AppBundle ZIP output folder.
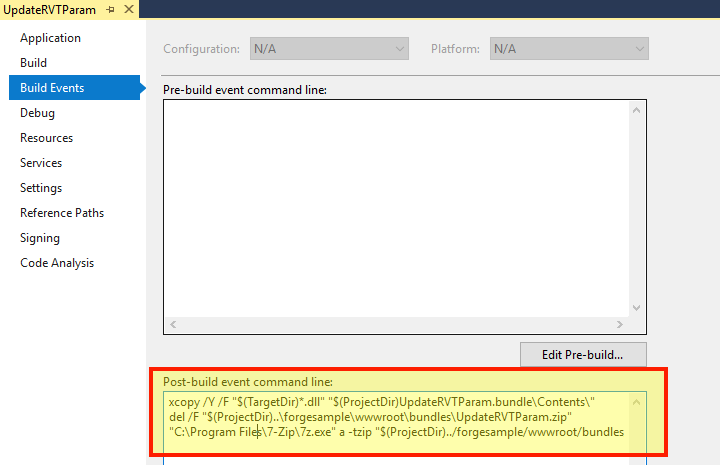
Now we need to ZIP the .bundle folder. Right-click on the project, select Properties, then open Build Events and copy the following into Post-build event command line field, as shown on the image below.
xcopy /Y /F "$(ProjectDir)PackageContents.xml" "$(TargetDir)\Bundle\$(MSBuildProjectName).bundle\"
xcopy /Y /F "$(TargetDir)*.*" "$(TargetDir)\Bundle\$(MSBuildProjectName).bundle\Contents\"
del /F "$(ProjectDir)..\designAutomationSample\wwwroot\bundles\UpdateIPTParam.zip"
"C:\Program Files\7-Zip\7z.exe" a -tzip "$(ProjectDir)../designAutomationSample/wwwroot/bundles/UpdateIPTParam.zip" "$(TargetDir)\bundle\$(MSBuildProjectName).bundle\" -xr0!*.pdb
This will copy the DLL from /bin/debug/ into .bundle/Contents folder, then use 7zip to create a zip, then finally copy the ZIP into /bundles folders of the webapp.
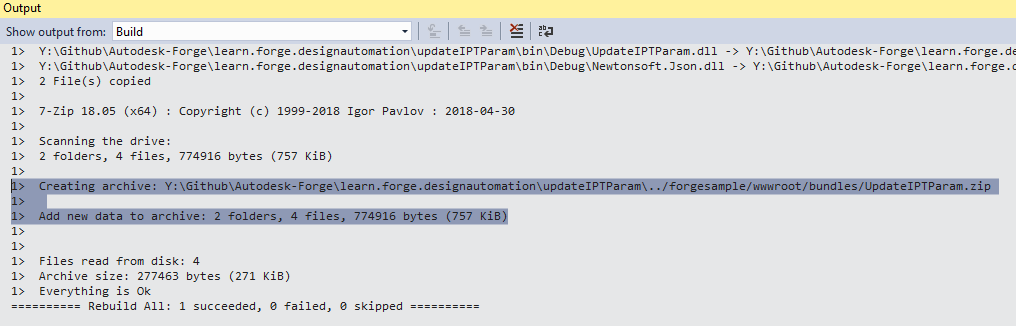
If you build the UpdateIPTParam project now you should see something like this on the Output window. Note the 2 folders and several files zipped. The zip file is created directly at the /wwwroot/bundles folder. This means you're doing great!
This step will help you create a basic Revit plugin for Design Automation. For more information, please visit My First Revit Plugin tutorial.
You may download the Bundle ZIP into the
bundles/(Node.js) or/designAutomationSample/wwwroot/bundles(.NET 6) folder and skip to Upload Plugin Bundle section.
Create a new project
ight-click on the solution, the Add >> New Project. Select Windows Desktop, then Class Library and, finally, name it UpdateRVTParam.
Please select .NET Framework 4.8. If not listed, please install the Dev Pack.
Right-click on References, then Add Reference and Browse for RevitAPI.dll (by default under C:\Program Files\Autodesk\Revit 201x folder). Then right-click on this RevitAPI reference, go to Properties, then set Copy Local to False.
Then right-click on the project, go to Manage NuGet Packages..., under Browser you can search for DesignAutomation.Revit and install Autodesk.Forge.DesignAutomation.Revit (choose the appropriate Revit version you need). Then search and install Newtonsoft.Json (which is used to parse input data in JSON format).
<?xml version="1.0" encoding="utf-8"?>
<packages>
  <package id="Autodesk.Forge.DesignAutomation.Revit" version="2021.0.0" targetFramework="net48" />
  <package id="Microsoft.CSharp" version="4.5.0" targetFramework="net48" />
  <package id="Newtonsoft.Json" version="12.0.1" targetFramework="net48" />
</packages>
The project should contain a Class1.cs class, let's rename the file to Commands.cs (for consistency).
At this point, the project should look like the following

using Autodesk.Revit.ApplicationServices;
using Autodesk.Revit.Attributes;
using Autodesk.Revit.DB;
using DesignAutomationFramework;
using Newtonsoft.Json;
using System.Collections.Generic;
using System.IO;

namespace Autodesk.Forge.Sample.DesignAutomation.Revit
{
    [Transaction(TransactionMode.Manual)]
    [Regeneration(RegenerationOption.Manual)]
    public class Commands : IExternalDBApplication
    {
        //Path of the project(i.e)project where your Window family files are present
        string OUTPUT_FILE = "OutputFile.rvt";

        public ExternalDBApplicationResult OnStartup(ControlledApplication application)
        {
            DesignAutomationBridge.DesignAutomationReadyEvent += HandleDesignAutomationReadyEvent;
            return ExternalDBApplicationResult.Succeeded;
        }

        private void HandleDesignAutomationReadyEvent(object sender, DesignAutomationReadyEventArgs e)
        {
            LogTrace("Design Automation Ready event triggered...");
            e.Succeeded = true;
            EditWindowParametersMethod(e.DesignAutomationData.RevitDoc);
        }

        private void EditWindowParametersMethod(Document doc)
        {
            InputParams inputParameters = JsonConvert.DeserializeObject<InputParams>(File.ReadAllText("params.json"));

            //Modifying the window parameters
            //Open transaction
            using (Transaction trans = new Transaction(doc))
            {
                trans.Start("Update window parameters");

                //Filter for windows
                FilteredElementCollector WindowCollector = new FilteredElementCollector(doc).OfCategory(BuiltInCategory.OST_Windows).WhereElementIsNotElementType();
                IList<ElementId> windowIds = WindowCollector.ToElementIds() as IList<ElementId>;

                foreach (ElementId windowId in windowIds)
                {
                    Element Window = doc.GetElement(windowId);
                    FamilyInstance FamInst = Window as FamilyInstance;
                    FamilySymbol FamSym = FamInst.Symbol;
                    SetElementParameter(FamSym, BuiltInParameter.WINDOW_HEIGHT, inputParameters.Height);
                    SetElementParameter(FamSym, BuiltInParameter.WINDOW_WIDTH, inputParameters.Width);
                }

                //To save all the changes commit the transaction
                trans.Commit();
            }

            //Save the updated file by overwriting the existing file
            ModelPath ProjectModelPath = ModelPathUtils.ConvertUserVisiblePathToModelPath(OUTPUT_FILE);
            SaveAsOptions SAO = new SaveAsOptions();
            SAO.OverwriteExistingFile = true;

            //Save the project file with updated window's parameters
            LogTrace("Saving file...");
            doc.SaveAs(ProjectModelPath, SAO);
        }

        public ExternalDBApplicationResult OnShutdown(ControlledApplication application)
        {
            return ExternalDBApplicationResult.Succeeded;
        }

        private void SetElementParameter(FamilySymbol FamSym, BuiltInParameter paraMeter, double parameterValue)
        {
            FamSym.get_Parameter(paraMeter).Set(parameterValue);
        }

        public class InputParams
        {
            public double Width { get; set; }
            public double Height { get; set; }
        }

        /// <summary>
        /// This will appear on the Design Automation output
        /// </summary>
        private static void LogTrace(string format, params object[] args) { System.Console.WriteLine(format, args); }
    }
}
Create a folder named UpdateRVTParam.bundle and, inside, a file named PackageContents.xml, then copy the following content to it. Learn more at the PackageContents.xml Format Reference. This file tells Revit to load our .addin plugin.
<?xml version="1.0" encoding="utf-8" ?>
<ApplicationPackage Name="RevitDesignAutomation" Description="Sample Plugin for Revit" Author="tutorials.autodesk.io">
  <CompanyDetails Name="Autodesk, Inc" Url="http://tutorials.autodesk.io" Email="forge.help@autodesk.com"/>
  <Components Description="Modify window parameters">
    <RuntimeRequirements SeriesMax="R2021" SeriesMin="R2019" Platform="Revit" OS="Win64"/>
    <ComponentEntry LoadOnRevitStartup="True" LoadOnCommandInvocation="False" AppDescription="Modify Window Parameters" ModuleName="./Contents/Autodesk.Forge.Sample.DesignAutomation.Revit.addin" Version="1.0.0" AppName="Modify Window Parameters"/>
  </Components>
</ApplicationPackage>
Autodesk.Forge.Sample.DesignAutomation.Revit.addin
Under UpdateRVTParam.bundle folder create a subfolder named Contents and, inside this folder, a new file called Autodesk.Forge.Sample.DesignAutomation.Revit.addin. This tells Revit how to load the plugin.
<?xml version="1.0" encoding="utf-8" standalone="no"?>
<RevitAddIns>
  <AddIn Type="DBApplication">
    <Name>Modify Window Parameters</Name>
    <FullClassName>Autodesk.Forge.Sample.DesignAutomation.Revit.Commands</FullClassName>
    <Text>Revit for Design Automation</Text>
    <Description>Revit for Design Automation</Description>
    <VisibilityMode>AlwaysVisible</VisibilityMode>
    <Assembly>.\UpdateRVTParam.dll</Assembly>
    <AddInId>000BD853-36E4-461f-9171-C5ACEDA4E723</AddInId>
    <VendorId>ADSK</VendorId>
    <VendorDescription>Autodesk, Inc, www.autodesk.com</VendorDescription>
  </AddIn>
</RevitAddIns>
Post-build event
For Node.js it is required to adjust the AppBundle ZIP output folder.
Now we need to ZIP the .bundle folder. Right-click on the project, select Properties, then open Build Events and copy the following into Post-build event command line field, as shown on the image below.
xcopy /Y /F "$(TargetDir)*.dll" "$(ProjectDir)UpdateRVTParam.bundle\Contents\"
del /F "$(ProjectDir)..\designAutomationSample\wwwroot\bundles\UpdateRVTParam.zip"
"C:\Program Files\7-Zip\7z.exe" a -tzip "$(ProjectDir)../designAutomationSample/wwwroot/bundles/UpdateRVTParam.zip" "$(ProjectDir)UpdateRVTParam.bundle\" -xr0!*.pdb
This will copy the DLL from /bin/debug/ into .bundle/Contents folder, then use 7zip to create a zip, then finally copy the ZIP into /bundles folders of the webapp.
Note how the Post-build event uses the project and folder names, so make sure you're using this names.
If you build the UpdateRVTParam project now you should see something like this on the Output window. Note the 2 folders and 3 files zipped. The zip file is created directly at the /wwwroot/bundles folder. This means you're doing great!
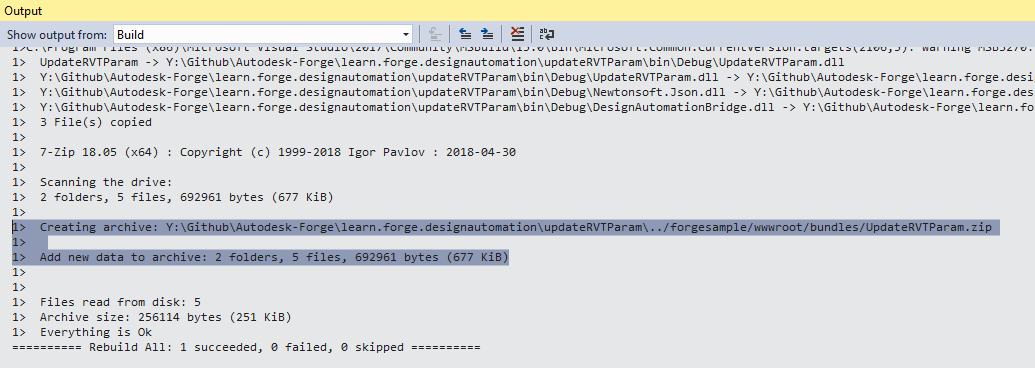
If the build output shows more than 2 folder, 5 files copied, please go back and ensure RevitAPI reference is set to Copy Local:False. You may need to remove all DLLs from
UpdateRVTParam.bundle/Contents/folder
This step will help you create a basic 3ds Max plugin for Design Automation. The entire tutorial uses the Microsoft .NET framework, including the plugin for 3ds Max. Note that 3ds Max can be automated by MAXScript, Python, NET API, and C++. The 3ds Max .NET API is probably not the most used for plugins, however, for other Design Automatiuon products it is the typical API. 3ds Max resources for .NET API can be found here (2019 links, but .NET API is supported for all available versions of the 3ds Max Design Automation engines):
Remember that for Design Automation, there should be no UI or prompts that cannot be automated. To automate the 3ds Max DA engine, you must provide some MAXScript. This is usually very easy as most customization can be exposed quickly to MAXScript (see function publishing for C++ and MAXScript .NET handling)
You may download the Bundle ZIP into the
bundles/(Node.js) or/designAutomationSample/wwwroot/bundles(.NET 6) folder and skip to Upload Plugin Bundle section.
Create a new .NET project
Right-click on the solution, the Add >> New Project. Select Windows Desktop, then Class Library and, finally, name it UpdateMAXParam. You will then need to reference the Autodesk.Max.Dll managed assembly (3ds Max .NET API core module). This module is found in the 3dsmax.exe folder and when referencing, make sure to turn off the "Copy Local" flag. There are a few other modules used for .NET API support (see The 3ds Max .NET SDK), but for this tutorial we will use only Autodesk.Max.dll. Then search and install Newtonsoft.Json (which is used to parse input data in JSON format).
Please select .NET Framework 4.8. If not listed, please install the Dev Pack.

As a result, the package.config should look like the following for the Newtonsoft.Json module.
<?xml version="1.0" encoding="utf-8"?>
<packages>
    <package id="Newtonsoft.Json" version="12.0.1" targetFramework="net47" />
</packages>
This is the main code that will run with 3ds Max. Copy the following content into Command.cs. There are three classes to handle the Design Automation porcessing. First is the InputParams that will be used to interface with the JSON input data. Next is ParameterChanger class that is used to iterate the scene, and find all Casement Windows (but could be any object types as identified by the class ids). Finally the RuntimeExecute is used to take the input and drive the automation. Also note there is a specialized logging that will output information to the Design Automation console. See the LogTrace function. Note that the ILogSys 3ds Max managed class is used for this, and the flags used with the LogEntry API indicated are necessary for the output to show in the Design Automation console.
using System;
using System.Collections.Generic;
using System.Linq;
using System.IO;

using Newtonsoft.Json;

using Autodesk.Max;

namespace Autodesk.Forge.Sample.DesignAutomation.Max
{
    /// <summary>
    /// Used to hold the parameters to change
    /// </summary>
    public class InputParams
    {
        public float Width { get; set; }
        public float Height { get; set; }
    }
    /// <summary>
    /// Changes parameters in automated way.
    /// Iterate entire scene to get all nodes
    /// In this example we specifically find Casement Windows by object class ID
    /// Then modify the width and height based on inputs.
    ///
    /// Could be expanded to find other window types, other objects, etc.
    /// </summary>
    static public class ParameterChanger
    {
        static List<IINode> m_sceneNodes = new List<IINode> { };

        /// <summary>
        /// Recursively go through the scene and get all nodes
        /// Use the Autodesk.Max APIs to get the children nodes
        /// </summary>
        static private void GetSceneNodes(IINode node)
        {
            m_sceneNodes.Add(node);

            for (int i = 0; i < node.NumberOfChildren; i++)
                GetSceneNodes(node.GetChildNode(i));
        }

        /// <summary>
        /// Function to specifically update Case Windows with input wedth and height parameters
        /// </summary>
        /// <param name="width">The new Width to set the Window</param>
        /// <param name="height">The new Height to set the Window</param>
        /// <returns>window count</returns>
        static public int UpdateWindowNodes(float width, float height)
        {
            IGlobal globalInterface = Autodesk.Max.GlobalInterface.Instance;
            IInterface14 coreInterface = globalInterface.COREInterface14;

            IINode nodeRoot = coreInterface.RootNode;
            m_sceneNodes.Clear();
            GetSceneNodes(nodeRoot);

            // 3ds Max uses a class ID for all object types. This is easiest way to find specific type.
            // ClassID (1902665597L, 1593788199L) == 0x71685F7D, 0x5EFF4727 for casement window
            IClass_ID cidCasementWindow = globalInterface.Class_ID.Create(0x71685F7D, 0x5EFF4727);

            // Use LINQ to filter for windows only - in case scene has more than one,
            // but this should still give us at least one for single window scene!
            var sceneWindows = from node in m_sceneNodes
                               where ((node.ObjectRef != null) && // In some cases the ObjectRef can be null for certain node types.
                                      (node.ObjectRef.ClassID.PartA == cidCasementWindow.PartA) &&
                                      (node.ObjectRef.ClassID.PartB == cidCasementWindow.PartB))
                               select node;

            // Iterate the casement windws and update the hight and width parameters.
            foreach (IINode item in sceneWindows)
            {
                // window is using old-style ParamArray rather than newer ParamBlk2
                IIParamArray pb = item.ObjectRef.ParamBlock;
                pb.SetValue(0, coreInterface.Time, height); // window height is at index zero.
                pb.SetValue(1, coreInterface.Time, width); // window width is at index one.
            }

            // If there are windows, save the window updates
            int status;
            if (sceneWindows.Count() > 0)
            {
                // The output file name must match what the Design Automation work item is specifying as output file.
                string full_filename = coreInterface.CurFilePath;
                string filename = coreInterface.CurFileName;
                string new_filename = full_filename.Replace(filename, "outputFile.max");
                status = coreInterface.SaveToFile(new_filename, true, false);
                if (status == 0) //error
                    return -1;
            }

            // return how many windows were modified.
            return sceneWindows.Count();
        }

    }

    /// <summary>
    /// This class is used to execute the automation. Above class could be connected to UI elements, or run by scripts directly.
    /// This class takes the input from JSON input and uses those values. This way it is more cohesive to web development.
    /// </summary>
    static public class RuntimeExecute
    {
        static public int ModifyWindowWidthHeight()
        {
            int count = 0;

            // Run entire code block with try/catch to help determine errors
            try
            {

                // read input parameters from JSON file
                InputParams inputParams = JsonConvert.DeserializeObject<InputParams>(File.ReadAllText("params.json"));

                count = ParameterChanger.UpdateWindowNodes(inputParams.Width, inputParams.Height);

            }
            catch (Exception e)
            {
                LogTrace("Exception Error: " + e.Message);
                return -1; //fail
            }

            LogTrace("Changed {0} Window objects.", count);
            return count; // 0+ means success, and how many objects were changed.
        }
        /// <summary>
        /// Information sent to this LogTrace will appear on the Design Automation output
        /// </summary>
        private static void LogTrace(string format, params object[] args)
        {
            System.Reflection.Assembly a = System.Reflection.Assembly.GetExecutingAssembly();
            string output_msg = string.Format("DLL {0} compiled on {1}; {2}",
                System.IO.Path.GetFileName(a.Location),
                File.GetLastWriteTime(a.Location),
                string.Format(format, args));

            IGlobal globalInterface = Autodesk.Max.GlobalInterface.Instance;
            IInterface14 coreInterface = globalInterface.COREInterface14;
            ILogSys log = coreInterface.Log;
            // Note flags are necessary to produce Design Automation output. This is same as C++:
            // SYSLOG_INFO | SYSLOG_IGNORE_VERBOSITY | SYSLOG_BROADCAST
            log.LogEntry(0x00000004 | 0x00040000 | 0x00010000, false, "", output_msg);
        }
    }
}
Create a folder named UpdateMAXParam.bundle and inside this folder add a file named PackageContents.xml. Copy the content listed below in the XML section into the PackageContents.xml file. Learn more at the PackageContents.xml Format Reference. For more 3ds Max specific information for packaging your 3ds Max plugins see here Packaging Plugins
This file will tell 3ds Max the modules to load (in this case the .NET API plugin assembly we are creating, but can also include MAXScripts, Python, and/or C++ plugins.) Because the plugin is being loaded through this feature, you only need to worry about the instructions to trigger your automation job. Please note that a unique ID for both ProductCode and UpgradeCode are required for 3ds Max to correctly load your code. See above mentioned documentation for details.
<?xml version="1.0" encoding="utf-8"?>
<ApplicationPackage
    SchemaVersion="1.0"
    AutodeskProduct="3ds Max"
    Name="Sample Design Automation Plugin for 3ds Max"
    Description="A sample package to update parameters of a 3ds Max scene file containing a casement window"
    AppVersion="2019.0.0"
    FriendlyVersion="2019.0.0"
    ProductType="Application"
    SupportedLocales="Enu"
    AppNameSpace="apps.autodesk.com"
    Author="Autodesk Forge"
    ProductCode="{6A8D06F4-C3DD-42DD-A69E-9B9617A7ABC0}"
    UpgradeCode="{CE88CEA5-47F6-423E-B9EC-E9FA683B5228}"
    >

    <CompanyDetails Name="Autodesk"
        Phone=" "
        Url="http://forge.autodesk.com"
        Email="noreply@autodesk.com" />

    <RuntimeRequirements OS="Win64" Platform="3ds Max" SeriesMin="2019" SeriesMax="2021" />

    <Components Description="assemblies parts">
        <RuntimeRequirements OS="Win64" Platform="3ds Max" SeriesMin="2019" SeriesMax="2021" />
        <ComponentEntry AppName="UpdateMAXParam" Version="2019.0.0" ModuleName="./Contents/UpdateMAXParam.dll" AppDescription="The Sample Design Automation Plugin managed assembly module" />
    </Components>

</ApplicationPackage>
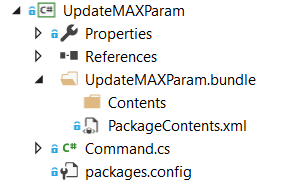
Finally, create a subfolder named Contents and leave it empty. At this point, the project should look like.
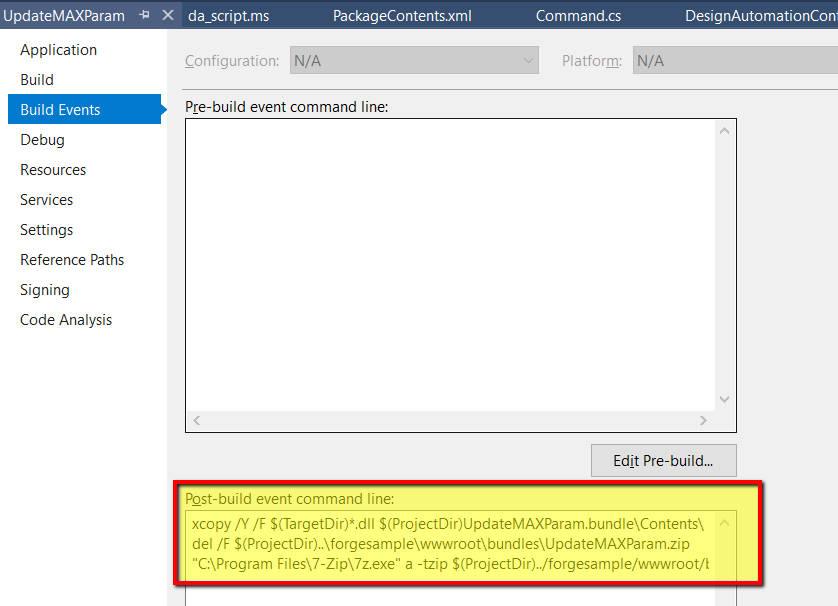
Post-build event
For Node.js it is required to adjust the AppBundle ZIP output folder.
Now we need to ZIP the .bundle folder. Right-click on the project, select Properties, then open Build Events and copy the following into Post-build event command line field, as shown on the image below.
xcopy /Y /F "$(TargetDir)*.dll" "$(ProjectDir)UpdateMAXParam.bundle\Contents\"
del /F "$(ProjectDir)..\designAutomationSample\wwwroot\bundles\UpdateMAXParam.zip"
"C:\Program Files\7-Zip\7z.exe" a -tzip "$(ProjectDir)../designAutomationSample/wwwroot/bundles/UpdateMAXParam.zip" "$(ProjectDir)UpdateMAXParam.bundle\" -xr0!*.pdb
This will copy the DLL from /bin/debug/ into .bundle/Contents folder, then use 7zip to create a zip, then finally copy the ZIP into /bundles folders of the webapp.
Note how the Post-build event uses the project and folder names, so make sure you're using these names.
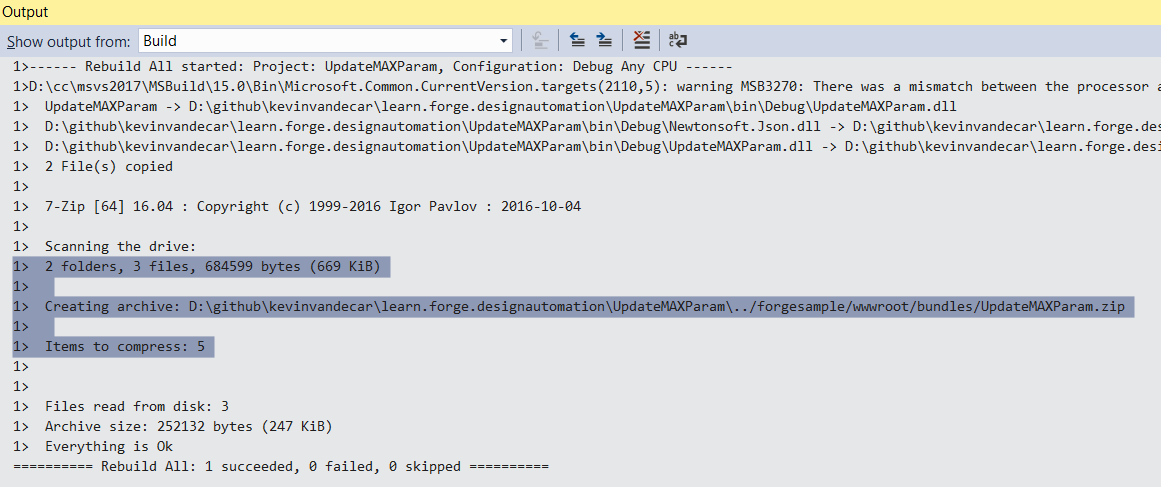
If you build the UpdateMAXParam project now you should see something like below in the Output window. Note that 2 folders and 3 files zipped. The zip file is created directly at the /wwwroot/bundles folder. This means you're doing great!
At this point, you could test the functionality using the 3ds Max batch tool. It works similarly to the 3ds Max Design Automation engine and is a good way to test all your automation locally before sending the job to the Forge DA cloud services. For .NET Classes to be instantiated in MAXScript environment, we can use the dotNetClass MAXScript function. For this sample project, the MAXScript code would look like this:
fn UpdateParam =
(
    da = dotNetClass("Autodesk.Forge.Sample.DesignAutomation.Max.RuntimeExecute")
    da.ModifyWindowWidthHeight()
)

UpdateParam()
To execute this locally, we could do test a a command-line prompt with something like this:
"%ADSK_3DSMAX_x64_2019%\3dsmaxbatch.exe" -sceneFile <myTestScene>.max da_script.ms
Later in this tutorial you will see these same instructions being sent to the 3ds Max Design Automation engine.
Upload Plugin Bundle
Now the ZIP bundle is ready, let's upload to Design Automation.
- Node.js & VSCode
- .NET 6 & VSCode
- .NET 6 & VS2022
Inside routes/ folder create DesignAutomation.js file.
- In this file we will write all the endpoints, we will add Utils class consisting of all the utility functions like creating design automation SDK instance, uploading file and few more helpfull functions which are used in this sample.
const _path = require("path");
const _fs = require("fs");
const _url = require("url");
const express = require("express");
const http = require("https");
const formdata = require("form-data");
const bodyParser = require("body-parser");
const multer = require("multer");
const router = express.Router();
const { getClient } = require("./common/oauth");
const config = require("../config");
const dav3 = require("autodesk.forge.designautomation");
const ForgeAPI = require("forge-apis");

router.use(bodyParser.json());

// Middleware for obtaining a token for each request.
router.use(async (req, res, next) => {
  req.oauth_client = await getClient(/*config.scopes.internal*/);
  req.oauth_token = req.oauth_client.getCredentials();
  next();
});

// Static instance of the DA API
let dav3Instance = null;

class Utils {
  static async Instance() {
    if (dav3Instance === null) {
      // Here it is ok to not await since we awaited in the call router.use()
      dav3Instance = new dav3.AutodeskForgeDesignAutomationClient(
        config.client
      );
      let FetchRefresh = async (data) => {
        // data is undefined in a fetch, but contains the old credentials in a refresh
        let client = await getClient();
        let credentials = client.getCredentials();
        // The line below is for testing
        //credentials.expires_in = 30; credentials.expires_at = new Date(Date.now() + credentials.expires_in * 1000);
        return credentials;
      };
      dav3Instance.authManager.authentications["2-legged"].fetchToken =
        FetchRefresh;
      dav3Instance.authManager.authentications["2-legged"].refreshToken =
        FetchRefresh;
    }
    return dav3Instance;
  }

  /// <summary>
  /// Returns the directory where bindles are stored on the local machine.
  /// </summary>
  static get LocalBundlesFolder() {
    return _path.resolve(_path.join(__dirname, "../", "bundles"));
  }

  /// <summary>
  /// Prefix for AppBundles and Activities
  /// </summary>
  static get NickName() {
    return config.credentials.client_id;
  }

  /// <summary>
  /// Alias for the app (e.g. DEV, STG, PROD). This value may come from an environment variable
  /// </summary>
  static get Alias() {
    return "dev";
  }

  /// <summary>
  /// Search files in a folder and filter them.
  /// </summary>
  static async findFiles(dir, filter) {
    return new Promise((fulfill, reject) => {
      _fs.readdir(dir, (err, files) => {
        if (err) return reject(err);
        if (filter !== undefined && typeof filter === "string")
          files = files.filter((file) => {
            return _path.extname(file) === filter;
          });
        else if (filter !== undefined && typeof filter === "object")
          files = files.filter((file) => {
            return filter.test(file);
          });
        fulfill(files);
      });
    });
  }

  /// <summary>
  /// Create a new DAv3 client/API with default settings
  /// </summary>
  static async dav3API(oauth2) {
    // There is 2 alternatives to setup an API instance, providing the access_token directly
    // let apiClient2 = new dav3.AutodeskForgeDesignAutomationClient(/*config.client*/);
    // apiClient2.authManager.authentications['2-legged'].accessToken = oauth2.access_token;
    //return (new dav3.AutodeskForgeDesignAutomationApi(apiClient));

    // Or use the Auto-Refresh feature
    let apiClient = await Utils.Instance();
    return new dav3.AutodeskForgeDesignAutomationApi(apiClient);
  }

  /// <summary>
  /// Helps identify the engine
  /// </summary>
  static EngineAttributes(engine) {
    if (engine.includes("3dsMax"))
      return {
        commandLine:
          '$(engine.path)\\3dsmaxbatch.exe -sceneFile "$(args[inputFile].path)" "$(settings[script].path)"',
        extension: "max",
        script:
          "da = dotNetClass('Autodesk.Forge.Sample.DesignAutomation.Max.RuntimeExecute')\nda.ModifyWindowWidthHeight()\n",
      };
    if (engine.includes("AutoCAD"))
      return {
        commandLine:
          '$(engine.path)\\accoreconsole.exe /i "$(args[inputFile].path)" /al "$(appbundles[{0}].path)" /s "$(settings[script].path)"',
        extension: "dwg",
        script: "UpdateParam\n",
      };
    if (engine.includes("Inventor"))
      return {
        commandLine:
          '$(engine.path)\\InventorCoreConsole.exe /i "$(args[inputFile].path)" /al "$(appbundles[{0}].path)"',
        extension: "ipt",
        script: "",
      };
    if (engine.includes("Revit"))
      return {
        commandLine:
          '$(engine.path)\\revitcoreconsole.exe /i "$(args[inputFile].path)" /al "$(appbundles[{0}].path)"',
        extension: "rvt",
        script: "",
      };

    throw new Error("Invalid engine");
  }

  static FormDataLength(form) {
    return new Promise((fulfill, reject) => {
      form.getLength((err, length) => {
        if (err) return reject(err);
        fulfill(length);
      });
    });
  }

  /// <summary>
  /// Upload a file
  /// </summary>
  static uploadFormDataWithFile(filepath, endpoint, params = null) {
    return new Promise(async (fulfill, reject) => {
      const fileStream = _fs.createReadStream(filepath);

      const form = new formdata();
      if (params) {
        const keys = Object.keys(params);
        for (let i = 0; i < keys.length; i++)
          form.append(keys[i], params[keys[i]]);
      }
      form.append("file", fileStream);

      let headers = form.getHeaders();
      headers["Cache-Control"] = "no-cache";
      headers["Content-Length"] = await Utils.FormDataLength(form);

      const urlinfo = _url.parse(endpoint);
      const postReq = http.request(
        {
          host: urlinfo.host,
          port: urlinfo.port || (urlinfo.protocol === "https:" ? 443 : 80),
          path: urlinfo.pathname,
          method: "POST",
          headers: headers,
        },
        (response) => {
          fulfill(response.statusCode);
        },
        (err) => {
          reject(err);
        }
      );

      form.pipe(postReq);
    });
  }
}
App Bundle
Before creating activity, we need to define app bundle with plugin and selecting the appropriate engine. Copy & paste the following endpoints after the utils class.
/// <summary>
/// Names of app bundles on this project
/// </summary>
router.get("/appbundles", async (/*GetLocalBundles*/ req, res) => {
  // this folder is placed under the public folder, which may expose the bundles
  // but it was defined this way so it be published on most hosts easily
  let bundles = await Utils.findFiles(Utils.LocalBundlesFolder, ".zip");
  bundles = bundles.map((fn) => _path.basename(fn, ".zip"));
  res.json(bundles);
});

/// <summary>
/// Return a list of available engines
/// </summary>
router.get(
  "/aps/designautomation/engines",
  async (/*GetAvailableEngines*/ req, res) => {
    let that = this;
    let Allengines = [];
    let paginationToken = null;
    try {
      const api = await Utils.dav3API(req.oauth_token);
      while (true) {
        let engines = await api.getEngines({ page: paginationToken });
        Allengines = Allengines.concat(engines.data);
        if (engines.paginationToken == null) break;
        paginationToken = engines.paginationToken;
      }
      res.json(Allengines.sort()); // return list of engines
    } catch (ex) {
      console.error(ex);
      res.json([]);
    }
  }
);

/// <summary>
/// Define a new appbundle
/// </summary>
router.post(
  "/aps/designautomation/appbundles",
  async (/*CreateAppBundle*/ req, res) => {
    const appBundleSpecs = req.body;

    // basic input validation
    const zipFileName = appBundleSpecs.zipFileName;
    const engineName = appBundleSpecs.engine;

    // standard name for this sample
    const appBundleName = zipFileName + "AppBundle";

    // check if ZIP with bundle is here
    const packageZipPath = _path.join(
      Utils.LocalBundlesFolder,
      zipFileName + ".zip"
    );

    // get defined app bundles
    const api = await Utils.dav3API(req.oauth_token);
    let appBundles = null;
    try {
      appBundles = await api.getAppBundles();
    } catch (ex) {
      console.error(ex);
      return res.status(500).json({
        diagnostic: "Failed to get the Bundle list",
      });
    }
    // check if app bundle is already define
    let newAppVersion = null;
    const qualifiedAppBundleId = `${Utils.NickName}.${appBundleName}+${Utils.Alias}`;
    if (!appBundles.data.includes(qualifiedAppBundleId)) {
      // create an appbundle (version 1)
      // const appBundleSpec = {
      //         package: appBundleName,
      //         engine: engineName,
      //         id: appBundleName,
      //         description: `Description for ${appBundleName}`
      //     };
      const appBundleSpec = dav3.AppBundle.constructFromObject({
        package: appBundleName,
        engine: engineName,
        id: appBundleName,
        description: `Description for ${appBundleName}`,
      });
      try {
        newAppVersion = await api.createAppBundle(appBundleSpec);
      } catch (ex) {
        console.error(ex);
        return res.status(500).json({
          diagnostic: "Cannot create new app",
        });
      }

      // create alias pointing to v1
      const aliasSpec =
        //dav3.Alias.constructFromObject({
        {
          id: Utils.Alias,
          version: 1,
        };
      try {
        const newAlias = await api.createAppBundleAlias(
          appBundleName,
          aliasSpec
        );
      } catch (ex) {
        console.error(ex);
        return res.status(500).json({
          diagnostic: "Failed to create an alias",
        });
      }
    } else {
      // create new version
      const appBundleSpec =
        //dav3.AppBundle.constructFromObject({
        {
          engine: engineName,
          description: appBundleName,
        };
      try {
        newAppVersion = await api.createAppBundleVersion(
          appBundleName,
          appBundleSpec
        );
      } catch (ex) {
        console.error(ex);
        return res.status(500).json({
          diagnostic: "Cannot create new version",
        });
      }

      // update alias pointing to v+1
      const aliasSpec =
        //dav3.AliasPatch.constructFromObject({
        {
          version: newAppVersion.version,
        };
      try {
        const newAlias = await api.modifyAppBundleAlias(
          appBundleName,
          Utils.Alias,
          aliasSpec
        );
      } catch (ex) {
        console.error(ex);
        return res.status(500).json({
          diagnostic: "Failed to create an alias",
        });
      }
    }

    // upload the zip with .bundle
    try {
      // curl https://bucketname.s3.amazonaws.com/
      // -F key = apps/myApp/myfile.zip
      // -F content-type = application/octet-stream
      // -F policy = eyJleHBpcmF0aW9uIjoiMjAxOC0wNi0yMVQxMzo...(trimmed)
      // -F x-amz-signature = 800e52d73579387757e1c1cd88762...(trimmed)
      // -F x-amz-credential = AKIAIOSFODNN7EXAMPLE/20180621/us-west-2/s3/aws4_request/
      // -F x-amz-algorithm = AWS4-HMAC-SHA256
      // -F x-amz-date = 20180621T091656Z
      // -F file=@E:myfile.zip
      //
      // The ‘file’ field must be at the end, all fields after ‘file’ will be ignored.
      await Utils.uploadFormDataWithFile(
        packageZipPath,
        newAppVersion.uploadParameters.endpointURL,
        newAppVersion.uploadParameters.formData
      );
    } catch (ex) {
      console.error(ex);
      return res.status(500).json({
        diagnostic: "Failed to upload bundle on s3",
      });
    }

    res.status(200).json({
      appBundle: qualifiedAppBundleId,
      version: newAppVersion.version,
    });
  }
);

module.exports = router;
Now let's "mount" the router to our server application by modifying the server.js:
const _path = require("path");
const express = require("express");
const cookieSession = require("cookie-session");
const config = require("./config");
if (!config.credentials.client_id || !config.credentials.client_secret)
  return console.error(
    "Missing APS_CLIENT_ID or APS_CLIENT_SECRET env variables."
  );

let app = express();
app.use(express.static(_path.join(__dirname, "./wwwroot")));
app.use(
  cookieSession({
    name: "aps_session",
    keys: ["aps_secure_key"],
    maxAge: 60 * 60 * 1000, // 1 hour, same as the 2 legged lifespan token
  })
);
app.use(
  express.json({
    limit: "50mb",
  })
);

app.use("/api", require("./routes/DesignAutomation"));
app.set("port", process.env.PORT || 8080);

module.exports = app;
Under Controllers folder create a DesignAutomationController.cs with the following content. This is just the class, we'll define the endpoints later, but note the DesignAutomationHub at the end, which allow us push notifications to the client via SignalR.
using Autodesk.Forge;
using Autodesk.Forge.Client;
using Autodesk.Forge.DesignAutomation;
using Autodesk.Forge.DesignAutomation.Model;
using Autodesk.Forge.Model;
using Microsoft.AspNetCore.Hosting;
using Microsoft.AspNetCore.Http;
using Microsoft.AspNetCore.Mvc;
using Microsoft.AspNetCore.SignalR;
using Newtonsoft.Json;
using Newtonsoft.Json.Linq;
using RestSharp;
using System;
using System.Collections.Generic;
using System.IO;
using System.Linq;
using System.Net.Http;
using System.Threading.Tasks;
using Activity = Autodesk.Forge.DesignAutomation.Model.Activity;
using Alias = Autodesk.Forge.DesignAutomation.Model.Alias;
using AppBundle = Autodesk.Forge.DesignAutomation.Model.AppBundle;
using Parameter = Autodesk.Forge.DesignAutomation.Model.Parameter;
using WorkItem = Autodesk.Forge.DesignAutomation.Model.WorkItem;
using WorkItemStatus = Autodesk.Forge.DesignAutomation.Model.WorkItemStatus;


namespace designAutomationSample.Controllers
{
    [ApiController]
    public class DesignAutomationController : ControllerBase
    {
        // Used to access the application folder (temp location for files & bundles)
        private IWebHostEnvironment _env;
        // used to access the SignalR Hub
        private IHubContext<DesignAutomationHub> _hubContext;
        // used to store the s3 upload payload;
        private static PostCompleteS3UploadPayload _postCompleteS3UploadPayload;
        // Local folder for bundles
        public string LocalBundlesFolder { get { return Path.Combine(_env.WebRootPath, "bundles"); } }
        /// Prefix for AppBundles and Activities
        public static string NickName { get { return OAuthController.GetAppSetting("APS_CLIENT_ID"); } }
        /// Alias for the app (e.g. DEV, STG, PROD). This value may come from an environment variable
        public static string Alias { get { return "dev"; } }
        //This property manager S3 Upload Payload
        public static PostCompleteS3UploadPayload S3UploadPayload
        {
            get { return _postCompleteS3UploadPayload; }
            set { _postCompleteS3UploadPayload = value; }
        }
        // Design Automation v3 API
        DesignAutomationClient _designAutomation;

        // Constructor, where env and hubContext are specified
        public DesignAutomationController(IWebHostEnvironment env, IHubContext<DesignAutomationHub> hubContext, DesignAutomationClient api)
        {
            _designAutomation = api;
            _env = env;
            _hubContext = hubContext;
        }

        // **********************************
        //
        // Next we will add the methods here
        //
        // **********************************
    }

    /// <summary>
    /// Class uses for SignalR
    /// </summary>
    public class DesignAutomationHub : Microsoft.AspNetCore.SignalR.Hub
    {
        public string GetConnectionId() { return Context.ConnectionId; }
    }

}
Now let's add a few endpoints to this class. The following methods must be copied inside the DesignAutomationController class.
- GetLocalBundles
Look at the bundles folder and return a list of .ZIP files.
/// <summary>
/// Names of app bundles on this project
/// </summary>
[HttpGet]
[Route("api/appbundles")]
public string[] GetLocalBundles()
{
    // this folder is placed under the public folder, which may expose the bundles
    // but it was defined this way so it be published on most hosts easily
    return Directory.GetFiles(LocalBundlesFolder, "*.zip").Select(Path.GetFileNameWithoutExtension).ToArray();
}
- GetAvailableEngines
To define a bundle we also need the engine, so this endpoint return a list of all available engines.
/// <summary>
/// Return a list of available engines
/// </summary>
[HttpGet]
[Route("api/aps/designautomation/engines")]
public async Task<List<string>> GetAvailableEngines()
{
    dynamic oauth = await OAuthController.GetInternalAsync();
    List<string> allEngines = new List<string>();
    // define Engines API
    string paginationToken = null;
    while (true)
    {
        Page<string> engines = await _designAutomation.GetEnginesAsync(paginationToken);
        allEngines.AddRange(engines.Data);
        if (engines.PaginationToken == null)
            break;
        paginationToken = engines.PaginationToken;
    }
    allEngines.Sort();
    return allEngines; // return list of engines
}
- CreateAppBundle
That's where we actually define a new AppBundle:
/// <summary>
/// Define a new appbundle
/// </summary>
[HttpPost]
[Route("api/aps/designautomation/appbundles")]
public async Task<IActionResult> CreateAppBundle([FromBody]JObject appBundleSpecs)
{
    // basic input validation
    string zipFileName = appBundleSpecs["zipFileName"].Value<string>();
    string engineName = appBundleSpecs["engine"].Value<string>();

    // standard name for this sample
    string appBundleName = zipFileName + "AppBundle";

    // check if ZIP with bundle is here
    string packageZipPath = Path.Combine(LocalBundlesFolder, zipFileName + ".zip");
    if (!System.IO.File.Exists(packageZipPath)) throw new Exception("Appbundle not found at " + packageZipPath);

    // get defined app bundles
    Page<string> appBundles = await _designAutomation.GetAppBundlesAsync();

    // check if app bundle is already define
    dynamic newAppVersion;
    string qualifiedAppBundleId = string.Format("{0}.{1}+{2}", NickName, appBundleName, Alias);
    if (!appBundles.Data.Contains(qualifiedAppBundleId))
    {
        // create an appbundle (version 1)
        AppBundle appBundleSpec = new AppBundle()
        {
            Package = appBundleName,
            Engine = engineName,
            Id = appBundleName,
            Description = string.Format("Description for {0}", appBundleName),

        };
        newAppVersion = await _designAutomation.CreateAppBundleAsync(appBundleSpec);
        if (newAppVersion == null) throw new Exception("Cannot create new app");

        // create alias pointing to v1
        Alias aliasSpec = new Alias() { Id = Alias, Version = 1 };
        Alias newAlias = await _designAutomation.CreateAppBundleAliasAsync(appBundleName, aliasSpec);
    }
    else
    {
        // create new version
        AppBundle appBundleSpec = new AppBundle()
        {
            Engine = engineName,
            Description = appBundleName
        };
        newAppVersion = await _designAutomation.CreateAppBundleVersionAsync(appBundleName, appBundleSpec);
        if (newAppVersion == null) throw new Exception("Cannot create new version");

        // update alias pointing to v+1
        AliasPatch aliasSpec = new AliasPatch()
        {
            Version = newAppVersion.Version
        };
        Alias newAlias = await _designAutomation.ModifyAppBundleAliasAsync(appBundleName, Alias, aliasSpec);
    }

    // upload the zip with .bundle
    using (var client = new HttpClient())
    {
        using (var formData = new MultipartFormDataContent())
        {
            foreach (var kv in newAppVersion.UploadParameters.FormData)
            {
                if (kv.Value != null)
                {
                    formData.Add(new StringContent(kv.Value), kv.Key);
                }
            }
            using (var content = new StreamContent(new FileStream(packageZipPath, FileMode.Open)))
            {
                formData.Add(content, "file");
                using (var request = new HttpRequestMessage(HttpMethod.Post, newAppVersion.UploadParameters.EndpointURL) { Content = formData })
                {
                    var response = await client.SendAsync(request);
                    response.EnsureSuccessStatusCode();
                }
            }
        }
    }

    return Ok(new { AppBundle = qualifiedAppBundleId, Version = newAppVersion.Version });
}
As the DesignAutomationHub class is now defined (inside this controller), open the Startup.cs and, inside Configure method, add the following line
app.UseRouting();
app.UseEndpoints(routes =>
{
    routes.MapHub<Controllers.DesignAutomationHub>("/api/signalr/designautomation");
});
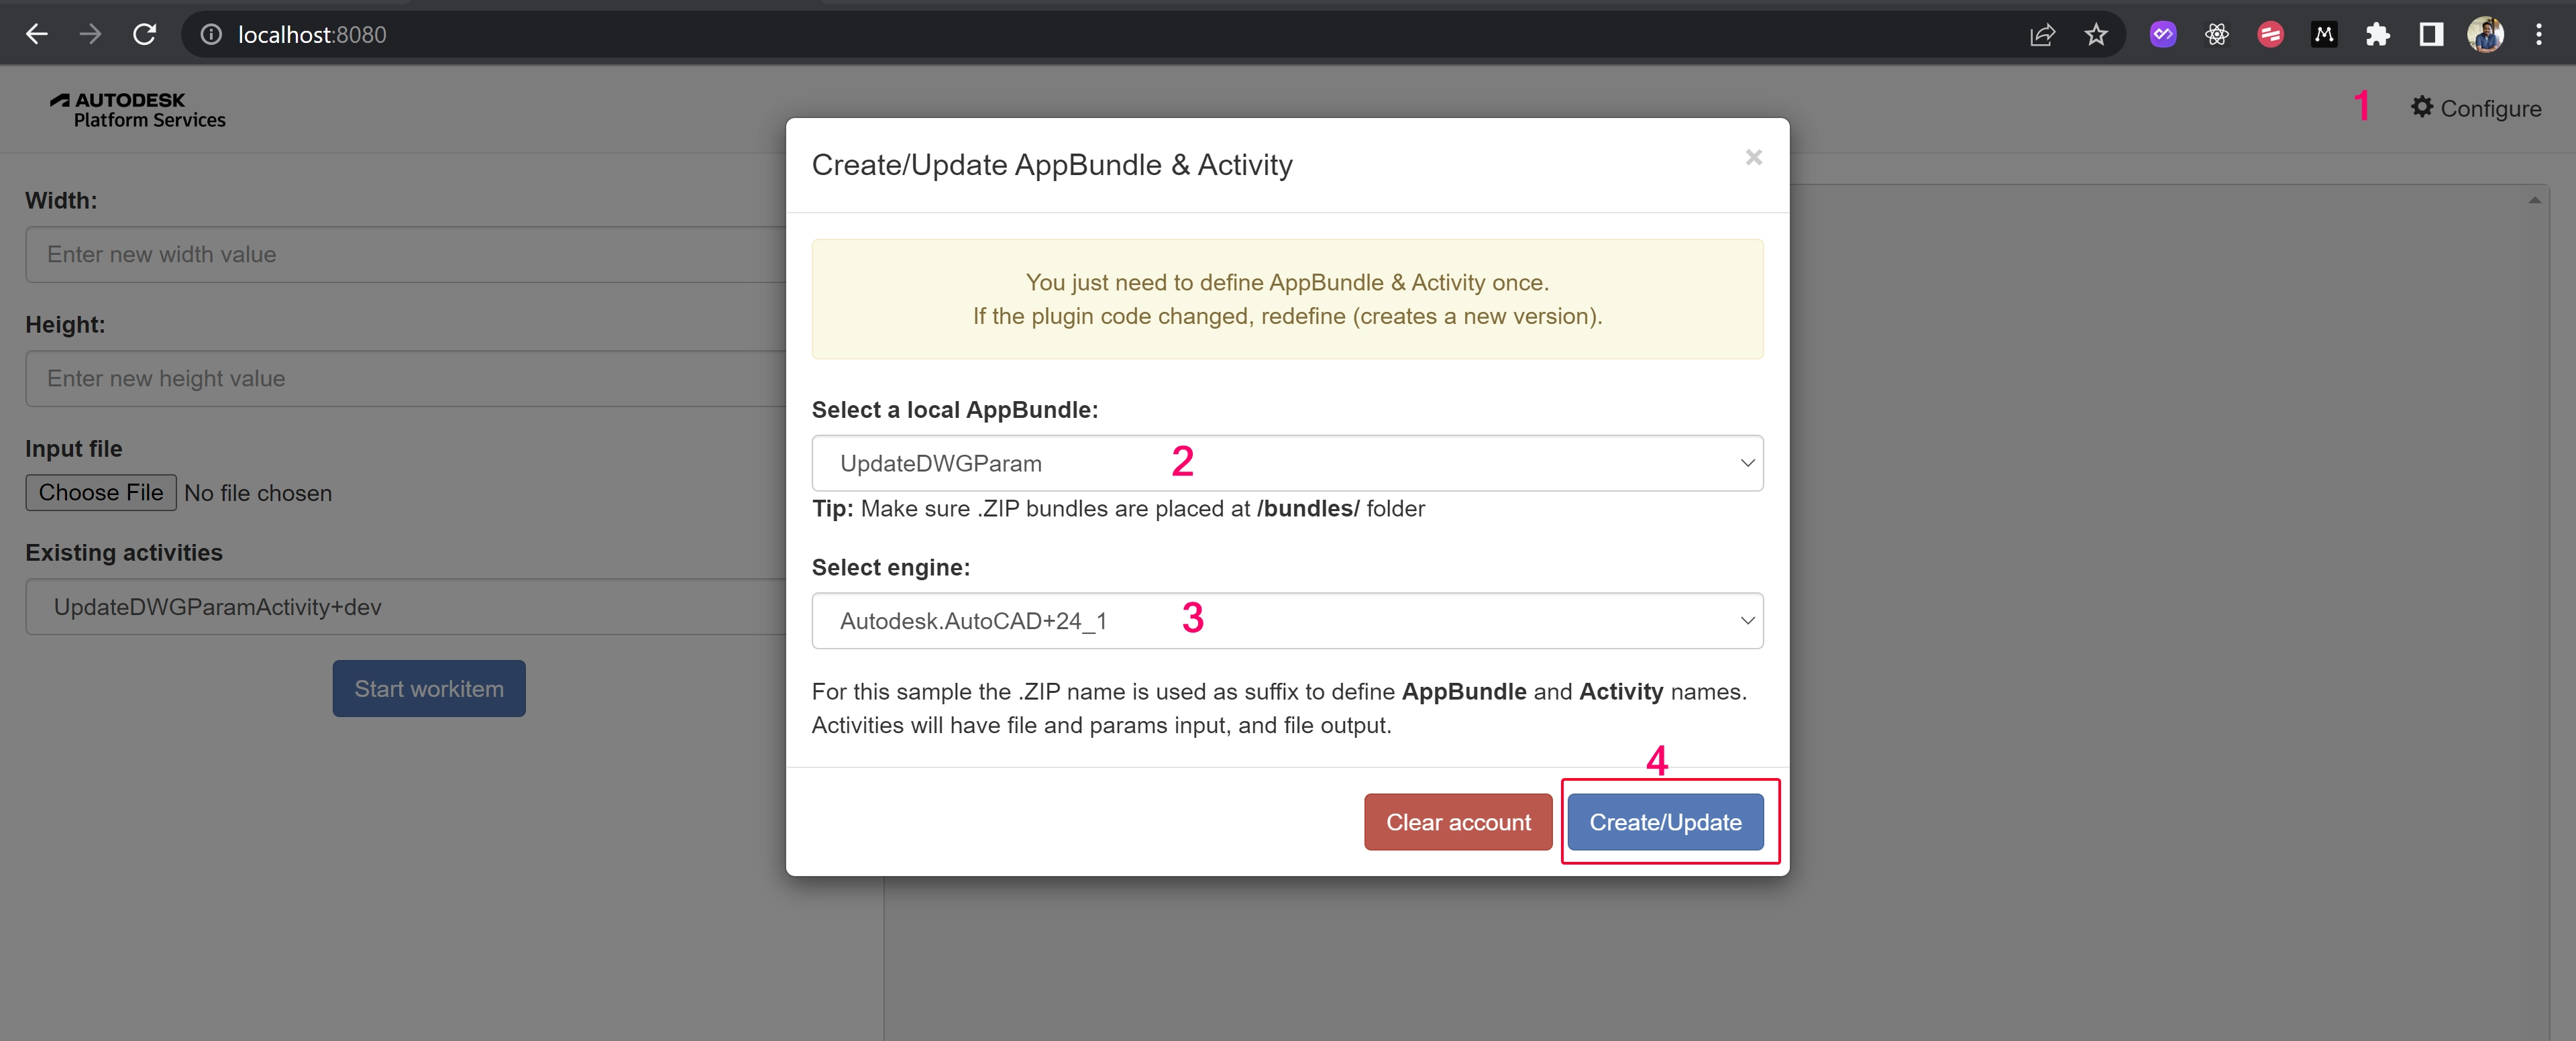
If you run the webapp now and click on Configure (top-right), you should see your AppBundle and a list of all available engines. Buttons do not work yet... let's move forward.